
In this tutorial, we will be modifying the self driving car we built in previous blog to a remote control car. Click here to learn how to build a self driving car using an L298N motor driver module.
Components needed
- L298N Motor Driver
- 2 DC motors
- 2 wheels
- HX1838 IR receiver
- Remote
- Jumper cables
- Arduino Uno board
- Power supply
What is an hx1838 ir receiver?
IR, or infrared, is a common and easy to use wireless communication technology. IR light is very similar to visible light but undetectable by human eye so perfect for wireless communication. Infrared communication requires IR receiver and IR transmitter. Infrared remote has a built in IR transmitter. Whenever a button is pressed on the remote, it sends an infrared signal in encoded form to the receiver. We will use HX1838 IR receiver to receive the IR signal transmitted from the remote control. We will use the IRremote library developed by Ken Shirriff to decode the received IR signal. Below are the decoded HEX values of the IR signal received from the IR remote control when button from 0 to 9 were pressed.
- 0 – FF6897
- 1 – FF30CF
- 2 – FF18E7
- 3 – FF7A85
- 4 – FF10EF
- 5 – FF38C7
- 6 – FF5AA5
- 7 – FF42BD
- 8 – FF4AB5
- 9 – FF52AD
In the program, I will use these values to decide if car should go forward, backward, left, right or should stop.
Completed circuit
The connections of the IR receiver is pretty simple. It has 3 pins. One is for the power. This pin will go to the 3.3 volts pin on the Arduino board. One will go to ground, and the last one will go the digital pin on the Arduino board.

The image above shows the completed circuit for remote control car.
The code
#include <IRremote.h>

int irPin = 7;
IRrecv irRecive(irPin);
decode_results results;

// left motor
int leftMotorSpeedPin = 3;
int leftMotorForwardPin = 4;
int leftMotorBackwardPin = 5;

// right motor
int rightMotorSpeedPin = 11;
int rightMotorForwardPin = 12;
int rightMotorBackwardPin = 13;

int direction = 0; //0 = stop, 1 = forward, 2 = bakward


void setup() {
  pinMode(leftMotorSpeedPin, OUTPUT);
  pinMode(leftMotorForwardPin, OUTPUT);
  pinMode(leftMotorBackwardPin, OUTPUT);
  pinMode(rightMotorSpeedPin, OUTPUT);
  pinMode(rightMotorForwardPin, OUTPUT);
  pinMode(rightMotorBackwardPin, OUTPUT);

  digitalWrite(leftMotorSpeedPin, HIGH);
  digitalWrite(rightMotorSpeedPin, HIGH);

  //analogWrite(leftMotorSpeedPin, i);
  //analogWrite(rightMotorSpeedPin, i);

  Serial.begin(9600);
  irRecive.enableIRIn();

}

void loop() {


  if (irRecive.decode(&results)) {

    Serial.println("Received = ");
    Serial.print(results.value);

    switch (results.value) {
      case 16718055:
        Serial.println("case: goForward");
        goForward();
        break;

      case 16730805:
        Serial.println("case: goBackwards");
        goBackward();
        break;

      case 16716015:
        Serial.println("case: goLeft");
        goLeft();
        delay(480);
        continueForwardOrBackward();
        break;

      case 16734885:
        Serial.println("case: goRight");
        goRight();
        delay(480);
        continueForwardOrBackward();
        break;

      case 4294967295:
        //do nothing
        break;

      default:
        Serial.println("case: default");
        stop();
    }

    irRecive.resume();

  }


}

void goForward() {
  Serial.println("goForward() function called");
  digitalWrite(leftMotorForwardPin, HIGH);
  digitalWrite(leftMotorBackwardPin, LOW);
  digitalWrite(rightMotorForwardPin, HIGH);
  digitalWrite(rightMotorBackwardPin, LOW);
  direction = 1;
}

void goBackward() {
  Serial.println("goBackward() function called");
  digitalWrite(leftMotorForwardPin, LOW);
  digitalWrite(leftMotorBackwardPin, HIGH);
  digitalWrite(rightMotorForwardPin, LOW);
  digitalWrite(rightMotorBackwardPin, HIGH);
  direction = 2;
}

void goRight() {
  Serial.println("goRight() function called");
  digitalWrite(leftMotorForwardPin, HIGH);
  digitalWrite(leftMotorBackwardPin, LOW);
  digitalWrite(rightMotorForwardPin, LOW);
  digitalWrite(rightMotorBackwardPin, LOW);
}

void goLeft() {
  Serial.println("goLeft() function called");
  digitalWrite(leftMotorForwardPin, LOW);
  digitalWrite(leftMotorBackwardPin, LOW);
  digitalWrite(rightMotorForwardPin, HIGH);
  digitalWrite(rightMotorBackwardPin, LOW);
}

void stop() {
  Serial.println("stop() function called");
  digitalWrite(leftMotorForwardPin, LOW);
  digitalWrite(leftMotorBackwardPin, LOW);
  digitalWrite(rightMotorForwardPin, LOW);
  digitalWrite(rightMotorBackwardPin, LOW);
  direction = 0;
}

void continueForwardOrBackward() {
  if (direction == 1) {
    goForward();
  } else if (direction == 2) {
    goBackward();
  } else {
    stop();
  }
}
This is the full code for the remote control car. Let’s break it down into sections to understand it.
before the setup function
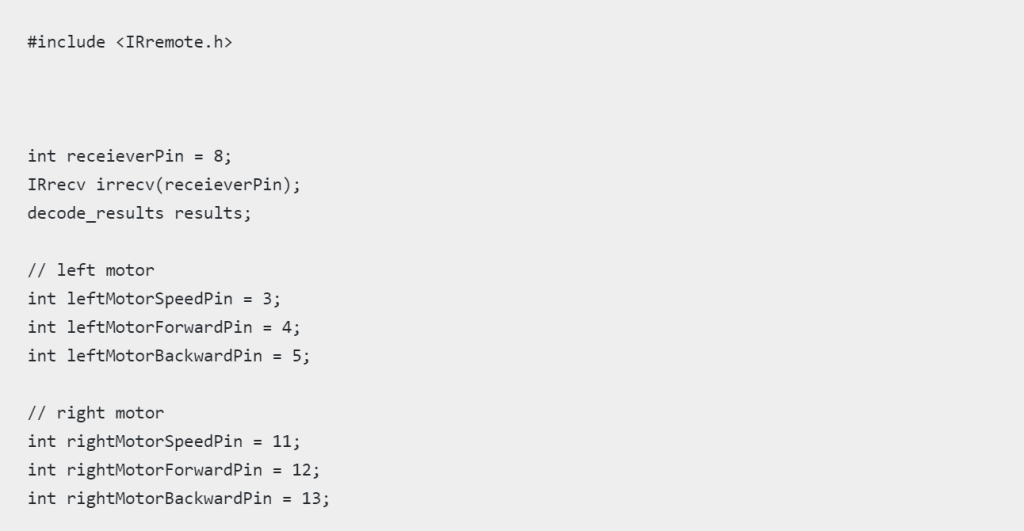
Before the setup function, the first thing we are doing is including the library for the IR receiver. Then, we created a variable for the infrared receiver’s digital pin. After that, we created the irrecv object of IRrecv class to read the IR signal the sensor receives. The results variable of type decode_results will hold the decoded value of IR signal received by the IR receiver. Rest of the variables are for two DC motors to connect to L298N motor driver.
The setup function
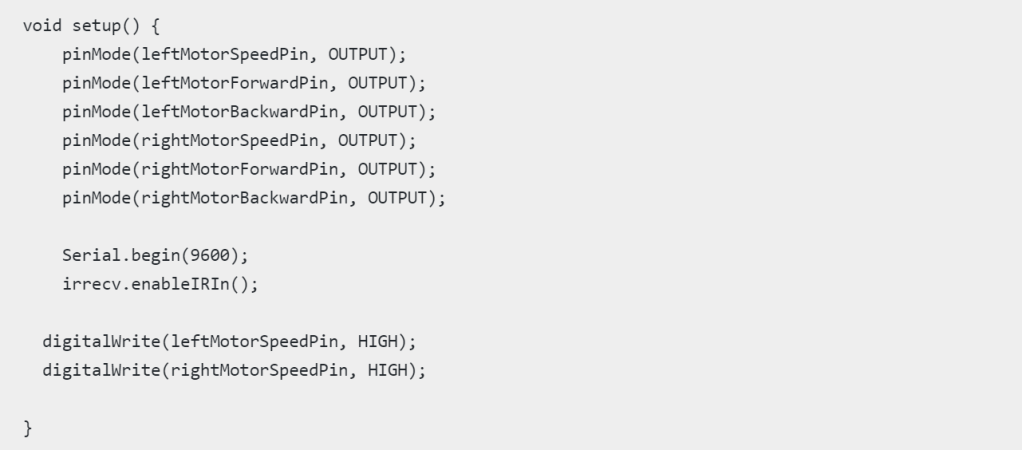
In the setup function, using pinMode function, all motor pins are set to OUTPUT. Then enableIRPin function of irrecv object is called to start the receiving of IR signal.
The loop function
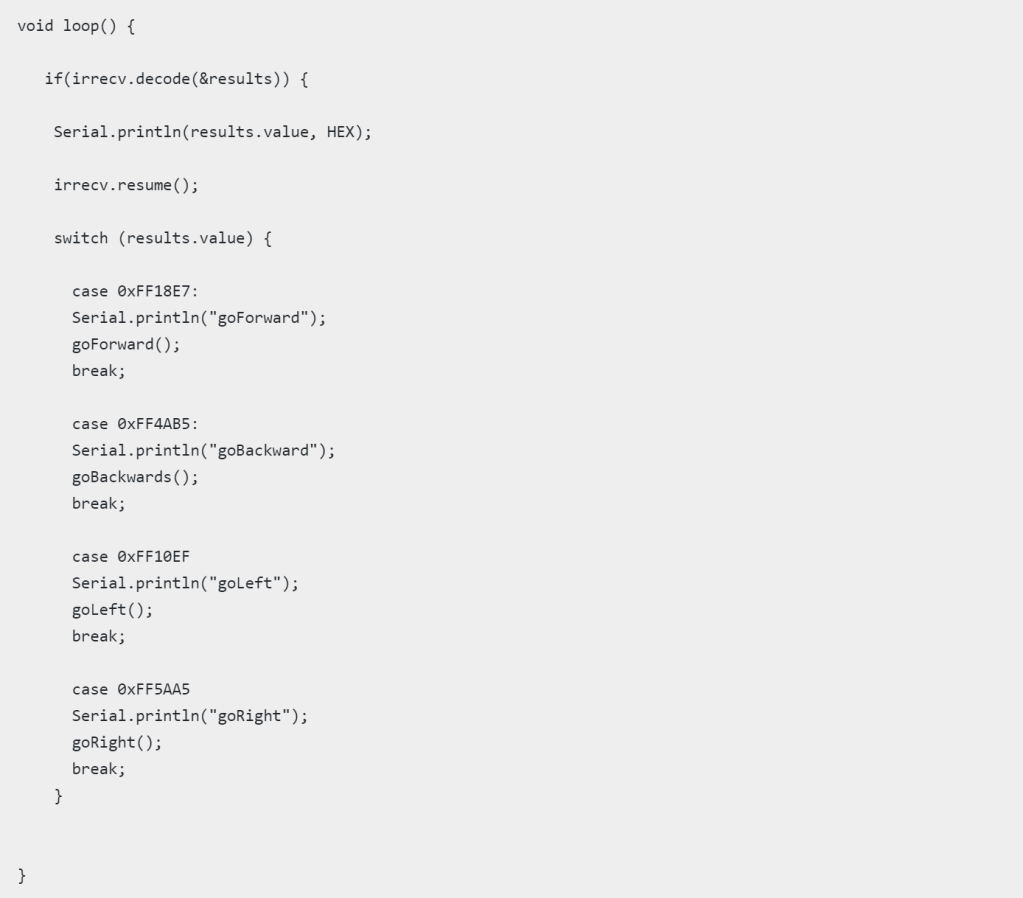
irrecv.decode(&results) returns true if IR signal is received. In the loop function, I wrote that if the button 2 is pressed, the car will go forward. If the button 8 is pressed, the car will go backward. If the button 4 is pressed the car will go left, and if the button 6 is pressed, the car will go right. So if any of those button are pressed, the IR receiver will read the encoded form of the button and act accordingly, but by default if any other buttons are pressed, the car will stop.

Hello, I recreated the project as described here. Unfortunately it does not work. The engines don’t run.
When you press the buttons on the remote control, only the value 4294967295 appears for all buttons on the serial monitor
What am I doing wrong?
Best regards, ULLi
LikeLike