
Components needed
- Arduino Uno board
- Breadboard
- Two Jumper Cables
- An LED (Any color)
- Resistor
- An USB cable to download the program to the Arduino Uno board
- A computer with an Arduino IDE installed
Completed Circuit

The image above shows the completed circuit to make an LED blink. An LED has two legs. The shorter one needs to be connected to the ground (GND), and the longer one needs to be connected to power via some resistor. A resistor is an electrical component that limits or regulates the flow of electrical current in an electronic circuit. If we don’t use the resistor, too much power will flow through the circuit which can blow up the LED.
The Program
Write the program below in the Arduino IDE.
void setup()
{
	pinMode(10, OUTPUT);
}

void loop()
{
	digitalWrite(10, HIGH);
	delay(1000);
	digitalWrite(10, LOW);
	delay(1000);
}
When you create a new file in Arduino to write a new program, you will see two empty functions called setup and loop. When the program runs, first the setup function gets called once, and then the loop function gets called repeatedly.
We can do all setup related things in the setup function. As you can see in the program above, the pin number 10 is set for Output using the pinMode function. https://www.arduino.cc/reference/en/language/functions/digital-io/pinmode/.
The loop function gets called repeatedly. So, we will turn the LED on and off in this function. In our circuit above, we connected the power pin of the LED to pin number 10. To make the LED turn on, we need to give power to pin number 10, and to make the LED turn off, we need to stop the power to pin number 10. We can achieve that by using the function digitalWrite. The function digitalWrite writes a HIGH(on), or LOW(off) to a given pin number. The delay option delays the program by the given number of milliseconds. So delay(1000) will delay the program for one second.
So, in our program, using the functions described the in the paragraph above, we are turning the LED on, and then wait for a second, then turning the LED off, and then wait for a second again. This happens repeatedly which makes our LED blink.
Downloading the program to the board
Now we built the circuit and wrote the program. The last step is to download that program to the Arduino Board. To download the program to the board, plug in the USB cable to the Arduino board. Then, you have to save your program. In order to do that, click the button with the arrow that is pointing down. That button is at the top left corner of the Arduino IDE. It look like this.

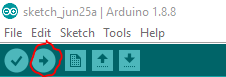
Finally, you have to upload the program. To do that, you have to click that button with the arrow pointing to the left. That button is also at the top left corner of the Arduino IDE. It looks something like this.
Once that is done, your LED should start to blink. This is what it will look like.

Nice, good work
LikeLiked by 1 person
Good work!!
LikeLiked by 1 person
nice Aarav. I think I got it. I do have few questions though. What is the frequency of loop function execution? Can loop function take longer time before it is executed next time? what will happen in that case?
LikeLiked by 1 person
Thanks Divyesh, the loop function gets executed repeatedly. We can use the delay function at the last line of the loop function to delay the execution of the loop function.
LikeLike